Friday, July 20, 2012

Custom Glitter Nail Polish

This is quite possibly the easiest and funnest DIY ever. The only thing I wish I knew is why didn't anyone tell me about this years ago? Glitter + Clear Nail Polish = home made glitter nail polish custom to suit your needs.


When I am really craving a new nail polish and finally go to the store to pick one out I am always drawn to the glittery ones in the front display yet always end up picking something more versatile instead. Also, the glitter nail polishes I already have are not glittery enough causing me to have to pile on layer after layer to get to the proper amount of glitter and by then the polish is so thick it will never dry and will inevitably get smudged. Solution - make your own polish just the way you like it. Also am I the only person with like five bottles of clear top-coat lying around?


So here's the scoop:


Package of assorted Glitter & Clear Nail Polish


I poured a little of the polish out to make room for the glitter because this one was very full. You will need a piece of paper rolled into a funnel to get the glitter inside neatly. The glitters I used in this combination were shades of pink, red, orange, and gold.


I call it Sunset Sparkle
So, pour as much glitter in as you want then shake well or stir with a toothpick. That's it.


This is the Sunset Sparkle painted on top of my all time favorite nail polish - Revlon Top Speed in Chili. Its my go to color and it drys fast and hard, good for inpatient people like me.


I actually made this one first. I call it Space Junk. To make this one I used larger grain glitter as well as the finer stuff used for Sunset Sparkle. I absolutely love this one because it is very sparkly. If your going to wear glitter polish you might as well go for the gusto. I used this on on top of Revlon Top Speed in Royal. Don't forget: glitter nail polish is also great for toes in the summer. 


Wednesday, July 18, 2012

What's for Breakfast? Two

Oatmeal-Raisin Cupcakes 
Kiwi Strawberry Smoothie

Last night despite the fact that it was 86 degrees in the house (yeah, no air conditioning) I found myself baking cookies. Smart right? Anyways, I say cookies because my dad has been hosting an optional workshop at work every other week, and upon request I bake cookies for these days as a reward for those who show up and as as incentive to others. This week I made Oatmeal-Raisin cookie cupcakes from Martha Stewart's Cupcakes. 

So I probably misspeak when I say "I was baking cookies" since my selection was found in a cupcake book but these confections seem to me one part cookie, one part cupcake, and one part muffin. 

The recipe:
3 3/4c. old fashioned oats
2 1/2c. flour
2/3c. oat bran (I used wheat bran instead)
1/2 tsp baking soda
1 1/2 tsp baking powder
1 tsp salt
2 tsp ground cinnamon
1 1/2c. butter(3 sticks)at room temperature
1c. sugar
1c. packed light-brown sugar
4 large eggs
2 tsp vanilla extract
1c. sour cream
1 1/2c. raisins
1c. sweetened flaked coconut

Preheat oven to 375 or 350 convection
Line muffin tins with paper liners. Whisk 2c. oats with the flour, oat bran, baking soda, baking powder, salt and cinnamon.

With an electric mixer on medium-high, cream the butter and both sugars until pale and fluffy. Add eggs one at a time beating after each addition. Add vanilla. Reduce speed to low. Add the flour mixture and beat until just combined. Beat in sour cream. Stir in raisins. 

Transfer 2 3/4c. batter to another bowl and add remaining 1 3/4c. oats and the coconut.

Fill each lined cup with 2 Tbsp plain batter and top with 1 Tbsp oat-coconut batter. Bake 18-20 min or until cake tester comes out clean. 
makes about 30.


This morning to go with my cupcake-cookie I whipped up another smoothie from the Food Network 50 Smoothies booklet. My ingredients were limited this morning as I rummaged through the kitchen but luckily I found a recipe with only 3 ingredients and ice needed - the Kiwi-strawberry smoothie (#11 in the booklet). This smoothie also happened to be the inaugural usage of my new blender, the Ninja Pulse. 
We decided to throw out our old smoothie maker when my dad pulled a piece of the blade out of his mouth after taking a sip of his blended ice coffee. Since then I have been using the old blender which was on its last leg and as also now met the same fate as the smoothie maker. So using this new and powerful machine was quite exciting. I also like that it comes with four single serve cups and a larger container too. The texture of this smoothie turned out perfect. Dare I say the best I've had at home thus far.

Anyways, back to the smoothie. Super easy, super yummy, and healthy too. 

Recipe: 
1 kiwi
1/2c. strawberries (I used them frozen)
1 Tbsp sugar
1c. ice
blend.
makes one smoothie

Thursday, July 5, 2012

Light Painting

There are so many reasons to love summer and one of the top on the list is fireflies. How can you not love something so incredibly pointless as light-up butts. All the other bugs in the world seem to find their mates without the need for blinking behinds. But that's what makes them so great, the nonsensicalness that is magical, that is summer. 


Anyways, I attempted to capture the firefly magic on camera with a long exposure shot but it was not as exciting as I thought it would be so I began running around with a flashlight instead. 


The one above is actually my dad.


This one's me


These were just done with a flashlight covered with our hands (hence the pinkish tint) but this would work great with sparklers, a glow stick, or even a cellphone light. 


To do light painting you need a camera that you can adjust the exposure time, I used my Cannon Rebel XS, a tripod, and a flashlight. To get a clear picture you really need two people, one to old the flashlight at the distance that you want it and one to focus the camera manually. You can play around with the shutter speed, in the second photo I had the shutter opened for the maximum 30 seconds (that was a really long time when running around in circles).


So have someone stand and hold the flashlight still to get the light focused. Then touch the photo button and don't touch the camera again until you hear the shutter close. The person with the light can run, jump, spin around, or even try to spell his or her name (just remember to spell it backwards), or draw a picture. Have fun with it and it's sure to be a surprise to look at once you're done. 

Tuesday, July 3, 2012

Pet Slime Mold

After this post it is quite possible that you will think me completely crazy. But ever since I was like seven or something I have always wanted a pet slime mold. I have the Planet Dexter Animal Grossology book to thank for this. This book is also responsible for my fear of tapeworms, nevertheless the book is one of my favorites. 


So What is a slime mold? According to the book a slime mold is actually a protoctista (prō'tək-tĭs'tə) - a single celled organism. Apparently slime molds can grow as big as the palm of your hand or even a beach towel - that's a very big cell.


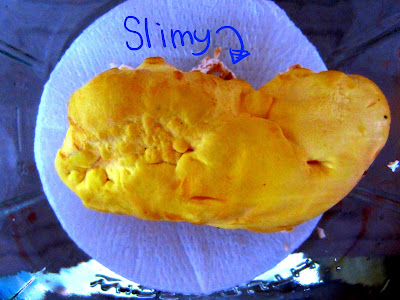
So the pages on slime molds in the book are full of illustrations making them look so cute and cuddly, and instructions for keeping a slime mold pet. I just knew I had to have one. The problem is finding one. Every time I see something slimy and yellow growing on a log in the woods I wonder if it might make a good pet. I have searched for over half my life for the perfect slimy pet, but to no avail, until today. While walking the dog this evening I spotted the spitting image of the pet slime mold in the Grossology book, and I had acquired a new pet.


Just in case you think this guy is as adorable as I do, you may be wondering: What does one need to happily house a pet slime mold?
     Well, a slime mold is very low maintenance and low cost. No expensive cages or equipment needed. In fact you probably have everything you need already in the house (other than the slime mold I assume). 


Supplies:
apple sauce cup or other similar container 
circular coffee filter or paper towel
rubber band
big mason jar
water 
oatmeal


Basically: Secure the rubber band over the coffee filter and the apple sauce cup to create a taught surface for your slime mold to live on. Place the cup inside the jar. Fill the jar with water so that the coffee filter is just touching the water. Next, place a pinch of ground oatmeal  on the coffee filter for your pet to eat - they like a healthy meal. Finally, place your new pet on its "bed". Just remember to give it a name and feed it every other day or so and maintain the water level. 


I have appropriately named this one Slimy.


Sunday, July 1, 2012

What's for Breakfast?

I've been really into smoothie making this summer its kind of a mission of mine to make as many of the smoothies from 50 Smoothies mini cookbook from the April 2011 Food Network Magazine. Food Network Mag is obviously the best food magazine out there and I love these 50... mini-cookbooks (they are cute and packed with helpful ideas; except for the  bacon one - I don't like bacon) If you don't have this smoothie booklet you can still get all the recipes on the Food Network website


The choice of smoothie usually depends on what we happen to already have on hand. So today's smoothie of choice was Peach-Ginger. I spotted this one due to what I thought was an unusual ingredient that we had in the fridge - buttermilk. This smoothie was pleasantly and surprisingly delicious.


(Ah! taking a picture is so hard when 
you just want to drink the darn thing.)


Peach-Ginger Smoothie: 
2 cups frozen sliced peaches
1 1/2 cups buttermilk
3 tablespoons brown sugar
1 tablespoon grated fresh ginger


This recipe will make two servings.